Contents
Get help with file explorer in windows 11
Get help with file explorer in windows: Press the Windows key + E to open File Explorer, or go to Start and type File Explorer into the search box. Pick File Explorer from the list of programmes.
Find and open File Explorer in windows 11
With Windows 11, File Explorer makes it easy and fast to find the files you need.
To look at it in Windows 11, click on it in the taskbar or Start menu or press the Windows logo key + E on your keyboard.
File Explorer: Instructions:
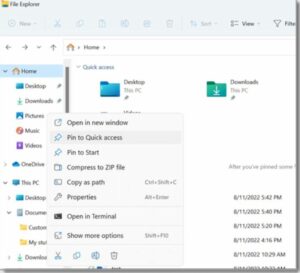
- To add a folder to Quick access, right-click it (or press and hold it) and choose Pin to Quick access from the menu.
- Choose the file you want to share, and click the Share button on the ribbon.
- To move a file or folder to a different location, select it and then click the Cut button on the ribbon.
- Go to the new spot, and then click the Paste button.
Note: You must right-click (or press and hold) and choose Open to copy and paste files and folders in Quick access.
- Click View on the ribbon to change your items’ appearance in File Explorer. You can choose to show icons, lists, details, and more.
- Choose View > Compact View to make the space between files smaller.
- You can search for important files on your PC and in the cloud from File Explorer Home.
Note: Go to Start > Settings > Accounts and sign in to your cloud account to turn on cloud search (s).
The new context menu in File Explorer is simpler and easier to use. This makes it easier to find commands you use often. Right-clicking on a file will bring up the new context menu.
get help with file explorer in windows 10
Press the Windows key + E to open File Explorer, or go to Start and type File Explorer into the search box. Pick File Explorer from the list of programmes.
Find and open File Explorer in windows 10 ?
Like many of the best things in life, File Explorer has improved over time. To check it out in Windows 10, click its icon in the taskbar or Start menu or press the Windows logo key + E on your keyboard.
Here are some important changes to Windows 10:
- File Explorer now has OneDrive built in. You can get a quick idea of how OneDrive works by looking at it on your PC.
- You’ll be on the Quick access page when you open File Explorer. There are links to your most-used folders and files, so you will only have to look through a few folders to find them.
- You can keep your most-used folders handy by pinning them to Quick access.
- You can now share files and photos by using apps from File Explorer. Select the files you want to share, go to the Share tab,
- click the Share button, and then choose an app. For more information on how to share files, look at Share files in File Explorer.
Here are a few more differences between Windows 8 and Windows 7:
- This PC has replaced My Computer so it won’t be on your desktop by default. See Where is My Computer Now? This PC to find out how to add This PC to your desktop or the Start menu.
- Libraries won’t show up in File Explorer if you don’t want them to. To put them in the left pane, go to the View tab and choose View > Navigation pane > Show libraries.
To share a file in File Explorer in Windows 11, select the file and click Share on the ribbon. You can also right-click on the file (or press and hold it) and choose Share. Then, choose how you want to send the file and follow the steps for that option.
Use OneDrive – get help with file explorer in windows
If you have saved OneDrive files on your PC, you can share them in a few different ways from File Explorer:
Find a link that you can share.
- Pick a file or folder in OneDrive and click the “Share” button. Choose who can use the link, click “Apply,” and click “Copy link.” Email a link.
- Pick a file or folder in OneDrive and click the “Share” button. Click “Apply” after choosing who the link should work for. In the “To:” field, type in the names, groups, or email addresses of the people you want to share with. If you want, you can also add a message. Click Send to send the email.
You can share documents, photos, website links, and more with nearby devices by using Bluetooth or Wi-Fi. It will work on Windows 10 and Windows 11 devices. See Windows: Share things with nearby devices for more information.
Send an email – get help with file explorer in windows
If you have a desktop mail app, you can open a new message and attach the file by choosing the file and clicking Share > Email a contact. You can email the file to yourself or choose “Find more people” and choose from your list of references.
Pick a file, and then click the Share button. Under “Share with an app,” choose the app you want to share with, such as OneNote. You can also choose to Find more apps if the app you want isn’t on the list.
Learn how to share files over a home network in Windows 11 by reading File sharing over a network in Windows.
Pick a file, click on the tab that says “Share,” and then click “Share.” Choose how you want to send the file, then follow the steps for that option.
Use OneDrive
If you have saved OneDrive files on your PC, you can share them in two ways from File Explorer:
- Get a link that everyone can use. Right-click on a file or folder in OneDrive, hold the mouse button, and choose “Share a OneDrive link.” (If you’re using OneDrive for Business, click Share, Copy Link, and Copy.) Now you can put the link wherever you want.
- Just send an email with a link to a few people. Right-click (or press and hold) the file, choose More OneDrive sharing options > Invite people, and then type the email addresses of the people you want to invite. (If you’re using OneDrive for Business, click Share, pick an option from the drop-down menu, and click Apply. Then, type the email addresses above the blue line and click Send.)
Send an email
If you have a desktop mail app, you can open a new message and attach the file by selecting the file and clicking Share > Email.
Learn how to share files over a home network in Windows 10 by reading File sharing over a network in Windows.
To share your files with people in your workgroup or domain:
- Pick the file or folder you want to send to someone else.
- Go to the Share tab and pick Specific people from the list you want to share it with.
- Enter the email addresses of the people you want to share the file with, click Add after each one, and then click Share.
With Windows 10, you can share files, photos, website links, and more with nearby devices using Bluetooth or Wi-Fi.
Find your documents in Windows 11 – get help with file explorer in windows
You can find your files in Windows 11 in one of these ways.
You can search with the taskbar:
- Please type the name of a document or a word from it into the search box in the taskbar. You’ll see results for both the files on your PC and OneDrive. You can click on the Documents tab to narrow your Search. Then, your search results will only show records.
- File Explorer can be used to: Hold down the Start button (or right-click) and choose File Explorer from the taskbar to open File Explorer. Then choose where to look:
- You can quickly find the right files on your PC and in the cloud by using Search from Home.
- Also, you can find files inside a folder by using Search from a folder like Downloads.
- If you want a slow but thorough search, search from This PC instead of Home.
- With Windows 11, version 22H2, you can find your Office.com files using File Explorer Home. To change this setting, click More > Options. Choose how you want “Show files from Office.com” to be set under “Privacy” on the “General” tab.
Find your documents in Windows 10 – get help with file explorer in windows
You can find your files in Windows 10 in one of these ways.
- Use the taskbar to search: In the search box on the toolbar, type the name of a document or a word from it. You’ll see document results on your PC and OneDrive under “Best match.”
- File Explorer can be used to Search can be opened from the taskbar or by right-clicking on the Start menu and selecting File Explorer. Then, choose a place on the left to search or look around. For example, you can choose This PC to look at all devices and drives on your computer, or you can choose Documents to only look for files in that folder.
Sync files with OneDrive in Windows
With OneDrive, you can sync files between your computer and the cloud. This lets you access your files from your computer, phone, or the OneDrive website at OneDrive.com. If you add, change, or delete a file or folder in your OneDrive folder, the same happens on the OneDrive website and vice versa.
You can work with your synced files in File Explorer, even when you’re not connected to the Internet. Any changes you or other people make will be shared automatically when you’re online.
This article shows you how to download the OneDrive sync app and sign in with your personal, work, or school account to start syncing. With Microsoft 365 Apps for Business, you can sync files from your SharePoint sites.
Install and set up Onedrive
- If your computer has Windows 10, the OneDrive app is already there, so move on to step 2. If you don’t have Windows 10 or Office 2016, you can still use the new OneDrive sync app for Windows.
- Start putting OneDrive together.
If you have no accounts signed in to OneDrive
Follow these steps to start a OneDrive account if you still need to get one.
- Click “Start,” type “OneDrive,” and then open it:
- When using Windows 10, choose OneDrive.
- In Windows 7, you can find Microsoft OneDrive under Programs.
- In Windows 8.1, please search for the OneDrive for Business app and click on it.
- When OneDrive Setup starts, you can sign in using your personal account, work account, or school account.
Key points in OneDrive Setup
In OneDrive Setup, there are two important screens to look out for:
- On the “This is your OneDrive folder” screen, click Next to keep your OneDrive files in the default folder. Choose Change location if you want to move the folder to a different place. The best time to do this is now.
- On the screen, it says, “All your files are ready and on demand.” You can see how they are marked to show that they are only available online, locally, or continuously.
- With Files On-Demand, you can access all of your OneDrive files without downloading them all to your Windows device, which would take up space. Choose Next.
See and manage your OneDrive files
You’re all set. In File Explorer, your OneDrive files will be in the OneDrive folder. If you have more than one account, your files will be in OneDrive – Personal, and your work or school files will be in OneDrive – CompanyName.
You now have a white or blue cloud icon (or both) in your notification area, and your files have been synced to your computer. Moving your mouse over your blue cloud icon will say OneDrive – [YourTenantName].
If you want to change which folders on your computer are synced, right-click the cloud icon in the taskbar’s notification area and choose Settings > Account > Choose folders. You can learn more about your account and change other OneDrive settings here.
- Open File Explorer from the taskbar.
- Click View, then Show, and then Hidden items.
- Open File Explorer from the taskbar.
- Click View, then click Options and then click Change folder and search options.
- Click the View tab, then choose Show hidden files, folders, and drives in the Advanced settings. Then, press OK.
Import photos and videos windows 11 – Get help with file explorer in windows
You can bring pictures and videos from an SD card, a USB drive, a phone, or another device. Here’s how:
- Use a USB cable to link your device to your computer.
- Type photos into the search box on the taskbar, and then choose the Photos app from the list of results.
- Choose Import from the app bar.
- Your devices will automatically show up under “Import.”
- Choose your device from the list of connected ones.
- Wait until your device’s content loads.
- Pick the pictures and videos that you want to add.
- Choose where the folder is that you want to import into.
- Click Confirm to move the photos and videos.
Note for iPhone users: If you can’t import with your iPhone, make sure it’s unlocked and that you’ve given it permission.
Note for Android and other devices: If Import isn’t working on your Android phone or another device, you may need to change the USB settings on your phone from Charging over USB to Transfer Files or Transfer Photos.
Import photos and videos windows 10 – Get help with file explorer in windows
First, connect your phone to a PC by moving files with a USB cable.
- Start your phone and unlock the door. Your PC won’t be able to find the device if it is locked.
- Click the Start button and then click Photos to open the Photos app on your PC.
- Choose Import > From a connected device, then do what it says. You can choose what to bring in and where to put it. Wait a few minutes for the transfer and detection to take place.
In Conclusion – Get help with file explorer in windows
This is the end of our talk about how to get help with file explorer in windows. I hope you like this post and that it has helped you greatly. If you have any questions about how to get help with file explorer in windows, feel free to leave a comment. I like helping people. Thanks! To find out more, click here.
FAQs – Get help with file explorer in windows
How do I fix File Explorer problems?
- Run Automatic Repair
- Click “Start,” “Settings,” and “Update & Security” to get started. Then click Recovery, and then under “Advanced startup,” click Restart now.
- Choose “Troubleshoot,” “Advanced,” and “Startup Repair” from the “Choose an option” screen.
- Choose a username and enter your password.
How do I get File Explorer back to normal?
- Click on the View tab.
- Click the Reset Folders button.